Showing posts with label Sweet Art. Show all posts

Friday, October 03, 2014

Decorated Cookies Inspired by Kerala

I love traveling and all the new sights, sounds and experiences it brings. But I've come to realise that travel has something more to offer: design ideas! So here's what a recent trip to Kerala has led to:

Kerala Inspired Decorated Cookies

The idea for this set took root in Kerala itself, while I worked on our Onam pookalam. I started thinking of how a pookalam would be such a great thing to cookie-fy: just let your imagination loose with the designs of your choice! Then I considered other Kerala icons. Coconut trees were a given, because I have a cutter :D  I didn't want to go the Kathakali route as honestly, I find the green face-black eye combo a bit freaky! Kris really wanted me to make elephant cookies, especially because of her nettipattam fascination, but without a cutter I found it a bit tricky to pull off. Then it struck me, simple and sweet - a kasavu print!

Kasavu sari print cookies

This Onam was my first time wearing a kasavu sari, beautifully draped thanks to my dear sister-in-law's expertise. The basic kasavu look is a golden border (of varying thickness) against white or cream. That is what I've tried to replicate in this cookie, and it's incredibly simple to do. Just cover the cookie in white royal icing and let it dry completely, for about 6-8 hours. Then mix some edible gold dust with clear vanilla extract / lemon juice to get a paint consistency and use a square brush going from one side to the next. Then of course, you can get more adventurous, like the kasavu saris I saw when I went shopping this time, with intricate embroidery and even some north-south fusion happening!

Next, I got started on the coconut trees.The trickiest bit of course, is the leaves. You could pipe them on, and I did give that a shot. Not fun. Much easier, and also way more fun, is to do them using a technique called wet on wet icing, where you fill in a base colour and then immediately pipe other colours on top of it, so that the new icing sinks into the base icing. You can then manipulate the colours to create swirls or shading effects.

Coconut tree cookie tutorial

You'll need royal icing in:
- Brown, filling consistency
- Dark green, piping and filling consistencies
- Light green, filling consistency
- Yellow, filling consistency
- Orange, filling consistency (only if you want to add coconuts)

1. I started off filling in the trunks with brown icing and letting them dry, at least 2-4 hours. Then, working with one cookie at a time, outline the leaf part with dark green piping icing and fill in with the fill consistency.

2. Immediately pipe a line of light green icing starting from the center and moving out to the tip of each leaf.

3. Follow with the yellow on top of the light green, and you can be a bit random with this, as the yellow doesn't need to be uniform; I just found that the odd bit of yellow here and there made it pop a bit.

4. Now the fun part! Use a toothpick, or other pointy tool and drag it through the icing in sideways swirls from the top of the line to the tip of the leaf. Clean the pick on kitchen paper and then drag it through the center of the leaf from top to bottom.

5. Finish all the leaves in the same way. You can go back and do some more swirls if the icing needs to be spread better. Allow to dry till set 6-8 hours.

6. Add coconuts with the orange icing. If you want to be more realistic, use orange piping icing to add those funny bead-like thingies, like in the last tree. I asked hubby if he knew what they were, and apparently that's like the flower of the tree, can you believe it?! Use a brown food marker, or food paint and add random lines across the trunks if you want.

And now, best for last, my pookalam cookies!

Making pookalam cookies

I used some of my smaller flower and circle cutters to trace the outlines on the cookies with food markers, and freehanded the details in. Normally, cookies are decorated as described above for the trees: outline with a thicker icing and fill in with a looser one to get a smooth finish. But since a real pookalam is made with flower petals, it has a textured look. The easiest way of recreating that effect I felt was to use one thick icing to fill each section. Give it about 5 minutes to set, and then using a fondant tool (pictured) or a toothpick, start poking at the icing and disturb the surface to get that texture. It's important to use thick icing and give it those few minutes to begin to harden, as looser icing will just merge back and won't retain the texture. Then just leave it 4-6 hours to set completely.

Pookalam Cookies

Here's my complete set of pookalam cookies. I stuck to colours that are typically used and the designs can be anything you like. This is the sort of decorating I enjoy the most, where you can play around with several colours and patterns.

Kerala inspired Cookies

So if you love decorating as well, keep those eyes peeled the next time you take a trip; along with souvenirs, you just might find some brilliant inspiration too!


Friday, July 18, 2014

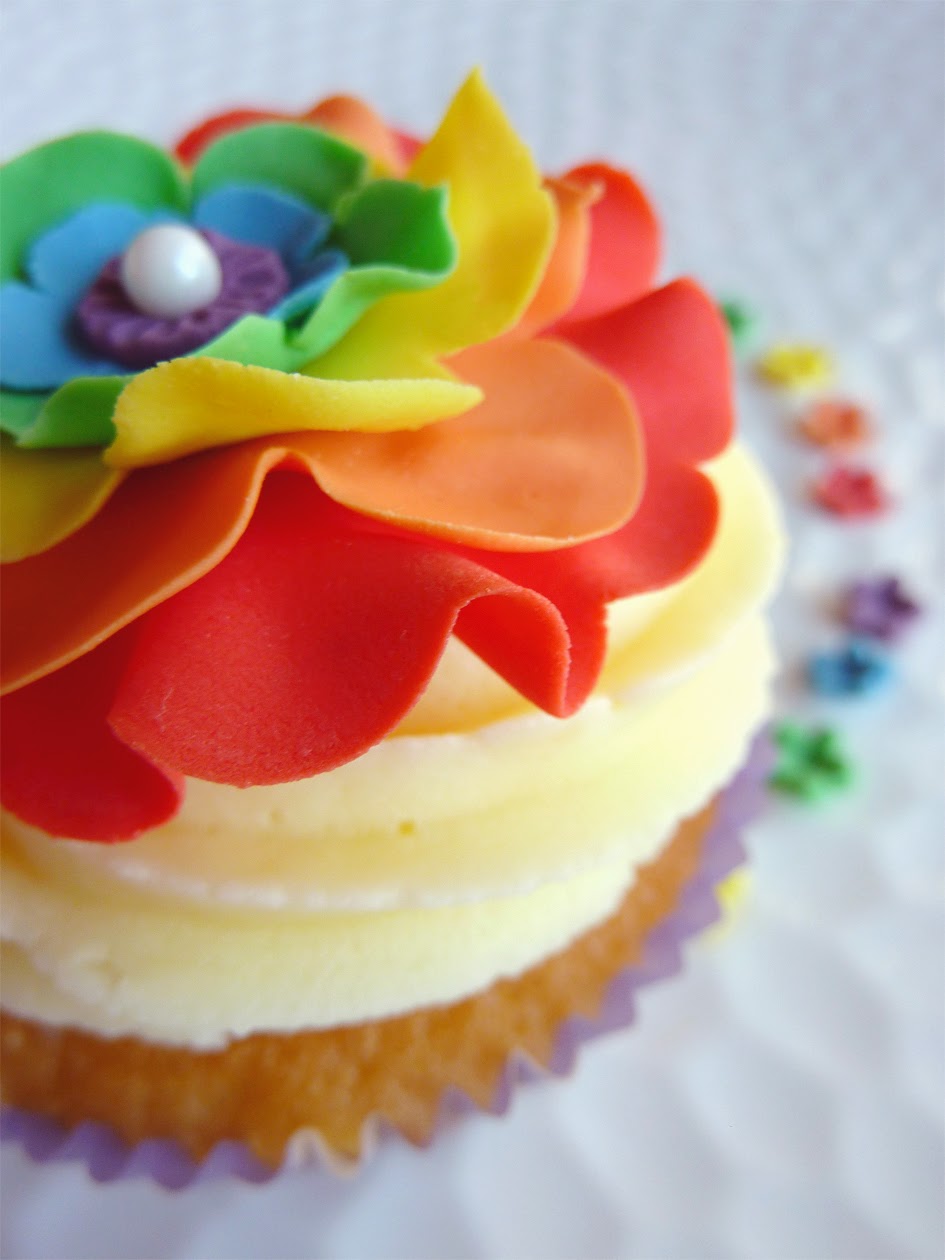
Rainbow Ruffled Fondant Flower Tutorial

My friends over at Pretty Paper Studio have a rainbow theme for this month's craft challenge (do check out their gorgeous work on their blog). Inspired by the colours, I wanted to play along too, though not with paper, but my preferred medium - fondant! I decided to combine rainbow colours with my current favourite decoration - ruffled fondant flowers.

Rainbow Ruffled Fondant Flower Tutorial

Before we get on with the tutorial, here are some of the things you'll need:

Supplies for Rainbow Ruffled Fondant Flowers

Fondant (or gumpaste or a mix of both) - in six colours.
Scalloped circle / flower cutters in various sizes.
Rolling pin.
Icing sugar (or cornstarch), for dusting.
Ball tool, for ruffling the edges of the flowers.
Foam pad.
Soft sponge pad.
Water and a paintbrush (reserved for decorating purposes only).
Kitchen paper.

My cutters come from various sets, as I don't have a single set for small flowers. The foam and sponge pads are Wilton's. Also, remember to keep your fondant wrapped tight in cling film when not in use.

And now the tutorial.

Building the Rainbow Ruffled Fondant Flower

1. Dust your work surface with some icing sugar and then roll out your red fondant till it's about 1 mm thick. Cut out the base layer of the flower with your largest cutter, and place it on the foam pad.

2. Hold the ball tool like a pencil with half the tip on the edge of the fondant and half on the pad, and roll back and forth with a gentle pressure; the fondant thins out and ruffles up. Don't overdo it as the fondant can rip.

Building the Rainbow Ruffled Fondant Flower

3. Gently lift your ruffled red fondant layer and place on the sponge pad. The flower will be assembled on this pad. Hold the ball tool upright and press down gently on the center to cup the layer.

4. Roll out the orange fondant and cut with the second-largest cutter. Ruffle the edges on the foam pad. Brush a tiny amount of water on the center of the red layer. Lift the orange layer, center it over the red layer and place it down. Press down gently with the ball tool so it adheres.

5. Roll tiny bits of kitchen paper into tubes and prop up any edges that are drooping too low. Once the fondant has had a couple of hours drying time, you can carefully ease the paper out and the fondant will stay raised.

Building the Rainbow Ruffled Fondant Flower

6. Repeat steps 3-5 for the yellow, green and blue fondant, making sure you use cutters of decreasing size. I rolled a small ball of purple fondant and adhered it to the blue layer with a dab of water.

7. You can leave it at this, or optionally press down a white pearl cachous in the center of the purple ball and add lines to the edge of the purple fondant by pressing down with a toothpick or a knife tool. Remember to place kitchen paper tubes wherever needed.

Gently transfer to a baking paper-lined tray, or leave it on the sponge pad to dry 4-6 hours before handling, and your rainbow ruffled fondant flower is ready!

Rainbow Ruffled Fondant Flower

As you can see, I used my flower to top off a freshly frosted cupcake. Just press down gently while the frosting is still soft. To adhere the flower to a fondant surface, I'd recommend using a dab of royal icing or sugar glue instead of plain water, to give it a stronger bond.

Hope you've enjoyed this tutorial!

Rainbow Ruffled Fondant Flower Cupcake

Sunday, May 11, 2014

Mothers & Daughters: Appreciating the Other Side

Kris's depiction of the two of us

This conversation took place a few weeks ago, while we were sitting in church waiting for Mass to begin.

Kris, in a serious whisper: "It's hard work being a mum, isn't it?"

My heart just filled up at this unexpected insight from my four-year-old. "Yes, it is." I whispered back to her, smiling mistily. We sat in a companionable silence for some time, till she turned to me and whispered just as seriously as before, "It's hard work being a daughter too."

Being in church, I had to subdue the laugh that bubbled up to a quiet chuckle. But as I sat there and thought about what she'd said, I had to agree, it's hard to be a daughter. Especially now that she has a basic level of understanding and thinks she knows all there is to know, it must be very hard to come up against the boundaries we set for her. Very hard to accept and act on our advice, when she thinks she knows best.

With all my attention focused on trying to be a good mum, and doing the things good mums should do, I don't think I'd ever really thought about our relationship from her perspective before. Smart remarks like that make me realise that my baby is a baby no longer, but very much her own person, with her own views and opinions that hubby & I need to take into account as we move ahead on this parenting journey. So I have to thank my little Kris for helping me to become more empathetic and open-minded as a mother.

On Friday, I received a wonderful bag of "surprises" that she'd made at school. It included a card, the drawing above of the two of us (did you see my green nail polish?!), a cloth bag with a similar picture painted on it, and a Mother's Day survey! It had questions on what I do, my likes and strengths, how we spend our time and so on. Her answers are both heartwarming and hilarious. They were written down by one of her teachers, and here I have to say, kudos to those ladies for getting 20 four-year-olds to answer a bunch of questions!

Highlights from the survey:

What does your Mum cook the best?
Answer: Mango curry and rice.
(Only, it's not Mum who used to make this, it's Dad! But Mum has learned how :D)

Why do you love your Mum?
Answer: Because she makes lovely cookies.
(So the way to her heart is also through her stomach!)

I love that the school has taken the effort of carrying out this little survey, as it has given us a beautiful memento of Kris at age four, how she sees me and what she values about us. It's rewarding to know that in addition to the "hard work", she sees us as having a loving and fun-filled relationship .... with food and baking being a big part of it, of course :)       

VVanilla cupcakes with textured fondant toppers and handmade ruffled flowers

Sunday, April 27, 2014

An Easter Education

"Is Easter the Easter bunny's birthday?" went the innocent question from my daughter Kris last year. Even as I laughed and pulled her in for a cuddle, I began wondering how I would tackle this. I grew up in a country where Easter was not a national celebration; it was significant only to the Christian community and we all knew that the central figure in the Easter story is Jesus (the bunny was way low-profile back then). Kris is growing up in an environment where all the major Christian festivals may be national holidays, but where Jesus is far removed from the mainstream celebrations and associated imagery. Santa becomes the star at Christmas, and Easter is the bunny's time in the limelight.

So it's quite understandable that Kris thought Easter revolved around the bunny. Of course I wanted to set her straight, but how do you explain death and resurrection to a three-year old and not leave her scared, or scarred? At the time, I simply told her that Easter was about Jesus, who was 'taken away' by the 'bad people', but that He managed to come back and save everybody, and that is why we celebrate Easter.

Placing marzipan crosses on the Hot Cross Bun Cookies
Kris putting the marzipan crosses on Hot Cross Bun Cookies

Don't get me wrong, I'm not against Santa or the bunny. I think they add a fun element to these celebrations and I happily share Kris's excitement in the Easter egg hunts and hat parades. We enjoy making Easter bonnets and bunny masks and as you can see here, we've been busy baking to share treats with our friends. But at the same time, I feel it's essential to remember what's really at the heart of this celebration, and more importantly, to take the time to help my child understand that too.

Easter sugar cookies and gift basket
Easter sugar cookies. Left: bunny-scape. Top right: Easter egg cookies. Bottom right: Easter gift basket.

Kris is now a year older, and wiser (sort of :D). Because of tv and her peers, she now has words like 'dead' and 'kill' in her vocabulary, which gave me room to be more specific about the Easter story this year. We've been going through her kiddy Bibles, reading the stories from them, and this has led to some memorable conversations. I will always cherish the priceless expressions that race across her face as she tries to absorb it all.

Our talks have also had another unexpected effect: in teaching Kris, I am learning afresh too. In searching for words to explain our faith in its simplest terms, I found myself reconnecting with it more profoundly than I ever have before. And it feels like I'm discovering the beauty of it all over again, which when you think about it, is exactly what this period should achieve.

Easter Sunday then dawned and we had a quiet morning at home. I was feeling rested and renewed. We video-chatted with my family and when my mother asked Kris why we were celebrating, she said it was because Jesus died and came back to save us.  I lit up with her answer .... and then deflated a moment later when she said, "but the bunny is the bigger part about Easter." {sigh}.

It's going to take quite a few Easters before she really gets it. I know it's a slow and lifelong process. Her questions haven't abated in the week since, and I'm encouraged that she wants to keep reading from her Bible, instead of me making her do it. Of all the things we do together, I especially treasure the time we've spent discussing Jesus over the past few weeks. I only hope I'm able to sustain her interest, and help her budding faith flourish. 
 
Piped royal icing filigree cross cake topper
An incredibly fragile royal icing filigree cross atop a simple vanilla cake with cream cheese frosting & toasted almonds.

Friday, March 28, 2014

One Direction Cookies

I've said it before, I'll say it again: the human capacity for creativity and inventiveness never ceases to amaze me. And I'm so very grateful to live in a time where ideas can be exchanged instantly, and inspiration is just a click away. Like it was in the case of these cookies.

One Direction Cookie Set
This set was requested by a friend for her niece, who is a huge fan of the band. My immediate response when she asked me was pure bafflement: how on earth do you convert real people into cookies? She assured me that she'd checked online and it had been done. I then looked up 'One Direction cookies' and one of the first image hits was this incredibly cute set by Sweet Sugarbelle.

Now I stumbled across Sugarbelle's blog a couple of years ago when I first began decorating, and since then I've been in awe of her work. She possesses a unique knack of creating dramatic designs out of the simplest cutters, and sometimes combination of cutters. See, there's that relentless creativity at work. So she designed this brilliant template of the band members and very generously shared it for free on her blog, along with a tutorial.

One Direction Band Cookies

Sugarbelle uses something called a Kopykake projector, which is designed for use on cakes and other sweets. It projects the design to be piped directly onto the sweet, which makes it very easy to pipe complex patterns. Again, there's that inventiveness: a projector to simplify decorating. Who thinks of all these things?! Sadly, I don't own such a projector so I did it the old-fashioned way: cut out the easier part of the template (which was the face and ears), traced around them with an edible ink marker, and freehanded all those fussy hairstyles in. 

One Direction Cookies with Template

I did not want to replicate Sugarbelle's platter in its entirety, so I added some different designs with the music notes and stars. I took a quick shot of the stars as I worked on them. Cookie decorating doesn't have to be difficult; something as simple as piping dots along the border can also make a big difference.

1D Stars Hearts Music Notes

This set was a first for me in a couple of ways. It's the first set of my cookies to travel; they went from Sydney to Bangalore and survived intact, thank you God! The other 'first' is making cookies based on real people. And of all the people in the world to cookiefy, I'd have never gone in this direction (yes, I absolutely had to say that :D), except for being asked. So a big thank you to my friend for trusting me with this, and a big thank you to Sugarbelle for sharing that super-creative template! I've got to say, despite my personal feelings (or lack thereof!) for the band, I love these little guys :D

One Direction Cookies

Monday, March 10, 2014

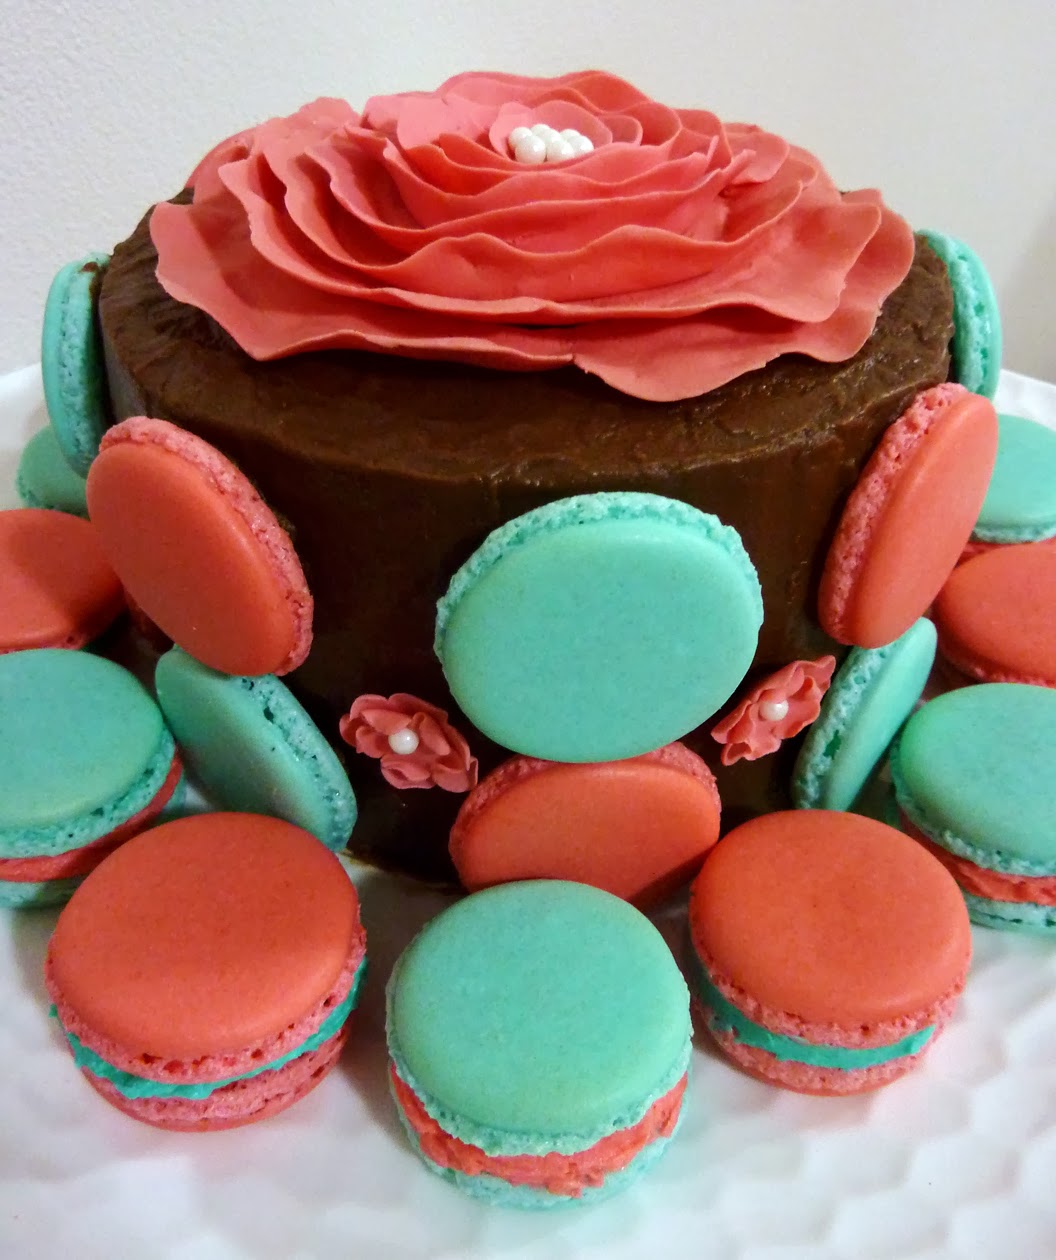
Milestones and a Macaron-Covered Cake

I think '30' started getting hyped up a few years ago. Or is it that I only started paying attention to the hype the closer I got to 30? Anyway, the closer I got, the more I started thinking about it and I guess I was mostly neutral; I never flipped out, but neither did I go, yaaay I'm going to be 30. Till some tragedies occurred close to home and shocked me into thinking straight: every day you're here, is a day to be glad for.

Chocolate cake with peppermint buttercream filling, fudge frosting and macaron shells

So I thought turning 30 deserved a special effort, when usually I just buy a couple of slices from my favourite bakery. And I hoped that if it turned out alright, I might be able to share recipes and ideas here. The cake itself came out great, though my macarons, while tasty enough, have a long way to go before they're technically proper.

The cake is the same Devil's Food Cake I made for my daughter's birthday last year, and the recipe is at the end of this post. This time, I used a third of the measurements to make three 6" layers each, that were sandwiched with buttercream (recipe over here). I used half this buttercream recipe and flavoured it with peppermint extract instead of vanilla. I divided the buttercream into two batches, dyed to match the two macaron colours. The frosting is a dark chocolate fudge, that I tried for the first time, and came out superbly. I had wanted to put a big flower on top, but honestly was a bit intimidated by them, till I found this easy technique.

I wanted to use macarons somehow, as they are my daughter's favourite dessert at the moment. However, they are notoriously tricky to get just right, and even on my fourth attempt I am far from getting the perfect texture. Should you want to give them a shot, here's a good video to get you started. I placed some unfilled macaron shells on the cake, and later kept some filled macarons around it. For the filling, I used the same peppermint buttercream as in the cake.

Chocolate cake with peppermint buttercream filling, fudge frosting and peppermint macarons

Now on a personal note, I had wondered if I should share some .... thoughts, on turning 30, but then I er, thought about it, and didn't feel like I had many :), except that sense of inexpressible gratitude. Even after reading this touching post by my friend Neelu, I didn't feel like I had much to say, as I thought she said it all, and said it brilliantly.

But then my birthday arrived. Start to finish it was beautiful, by God's grace. I received some wonderful, unexpected surprises. Wishes flowed in from friends and most of my family .... except for one person. My daughter :). She refused to wish me all day, right up to when we were about to cut the cake later that night, at which point her dad said enough was enough: wish mum now! She did, with a sheepish grin, and sang happy birthday as well.

The reason for all the drama? She's anti-birthdays at the moment. All you folks out there freaking about turning 30, 40, whatever, my little girl's got you beat. She's worried about turning five! Why? Because she doesn't want to leave preschool and the teachers she loves, doesn't want to go to 'big school' and doesn't want to grow up :) So for her right now, birthdays (mum's and her own included) are silly.

Then, the next day I received this incredible gift from my family. All my dad had told me before, was to expect a couple of DVDs in the mail. I sat to watch the first without a clue as to the contents. Words can't express the sheer joy I felt when I saw what it was: the recordings of mine and my sister's first birthdays!

Video recording had just taken off in India when I was a baby, and my first birthday was the first recorded event in my family. We had these on the old VHS tapes (remember those?), and over time they started gathering mildew and couldn't be viewed properly. So with a great deal of sadness, we all wrote them off as lost causes. I don't think any of us watched them in at least a decade. But on a recent trip back to our house in India, my dad found the tapes and got the salvageable portions converted to DVD format.

It's a priceless gift for all of us, something we thought we'd never see again, carefully restored. Even more priceless, because they include people we loved, like my grandfathers, who are not with us anymore. Precious memories in a tangible form that I can now share with my child, and show her at least some part of her history, and where she comes from. And yes, also help her to understand that she is not the only one who's had to deal with growing up; I too was a child like she is now, and I too had to grow up and go to big school and so on :)

All of these things made me realise that I actually do have a few thoughts that I'd like to share, so here goes:

  • Embrace your age wholeheartedly, and be thankful for it. If you ever start feeling otherwise, spare a thought for all those who weren't lucky to make it to whatever age you are now.
  • No matter where you reach, never forget where you've come from and the people who've been a part of your journey; more importantly, those that have helped you on that journey.
  • Change is inevitable, and seldom easy. But you do your best to deal and go on trusting He knows your way forward.
  • This is an echo of what Neelu said in her post, that I feel more strongly about now, having seen those DVDs again: document your life story! I am so grateful to my parents for choosing to record our birthdays; and so grateful to God for every moment from those first milestones to this one.
Chocolate cake and a glass of red!

Friday, February 21, 2014

Inspired by Turquoise: Pirate-themed Cookie Tutorial


 Pirate Girl and Ship Cookies

Ahoy me hearties! I'm very excited to share this 'tutorial' for pirate cookies that I made a couple of days ago. But before we get into the how-tos, a bit of background.

Last week, I made a big batch of turquoise icing for this set of christening cookies below. Working on this set, I realised that I'm a lot more comfortable piping patterns, than I am creating people and faces. I rarely do character cookies, and can't remember if I ever tried making any people-type cookies, prior to these angels.

Turquoise Christening Cookies

I had some leftover turquoise and white icing from this project, plus extra cookies, and I wanted to put it all to use. I started thinking of designs, and whenever I think turquoise, the first image that pops to mind is the ocean. The first time I saw this gorgeous colour in nature, was as a young girl at Dubai's Jumeirah Beach. I clearly recall feeling awestruck that water could be this mesmerising shade, and it's a fascination that still endures. From there, it was an easy leap to do something pirate-related, also because the little person in my house is pirate-mad at the moment.

Supplies Needed:
Sugar cookies - round or square.
Edible food pens (or toothpick, to mark out the design).
Royal icing, in turquoise, black, brown, flesh tone, white and pink. Consistency should be between flood and piping.
Piping bags & tips (I used Wilton tips #1 and #2).
Thin paintbrush (that is reserved for decorating purposes).
Food colour in red, orange or gold.
Gold and silver lustre dust (optional).

I began this project by sketching out some ideas. I don't normally do this, but when the design has several parts, it's better to have a guide. I then marked out the design onto the cookies with edible ink pens. If you don't have these, you could still gently mark out the sections with a toothpick or a scribe tool. It would be harder to see, but it'll do the job.  


To get your icing colours and bags ready, I recommend watching this terrific video that, pardon the drama, changed my life :) Honestly, it saves me loads of time. So for this project, I just turned some turquoise icing into brown, and then turned some of that into black. I tinted some of the white icing into the flesh toned icing, and a bit of that into the pink.

A note about the icing consistency: normally, you'd have a piping consistency for outlining and details, and a flood consistency that's runnier for filling in. To make life easier, I just stuck to the one consistency somewhere in between the two - the best way I can describe it is as between toothpaste and shampoo. It also works because each part of the design is quite small. So you outline and fill with the same piping bag, and run a toothpick along after you've filled in the areas, to even out the icing. 

These cookies require a bit more patience than usual as you can't pipe all the icing in one go. Couple of reasons for this: one, is to avoid dark colours bleeding into the light ones; so I piped the dark areas first and let them dry for 30-40 minutes before adding the lighter colours. The second reason is to create dimension ... or is it definition? Or maybe both :) This is a technique I've picked up from the top cookiers around, and that I've applied here to the pirate hats and the ocean. It's just a matter of piping in sections and letting each section dry before piping the adjoining areas. You'll see what I mean as we go along.

Girl Pirate Photo Tutorial:

Girl Pirates Cookie Tutorial
1. Outline and immediately fill in the pirate hat. Leave to dry about half an hour.
2. Pipe in the brim of the hat.
3. Add the t-shirt. (See, now it occurs to me that I could've done this the same time as step 1. Hopefully, I've saved you some time :D)
4. Once the hat has had at least one hour drying time, add the face icing, leaving gaps for the eye and mouth. Leave to dry for 30 min.
5. Add the neck and the white icing. There are a couple of ways of doing the eye: one is to pipe a dot of black icing as soon as you've piped the white icing; the black dot will sink into the white. This is what I did, and thankfully it didn't bleed much. Alternatively, you could wait for the white eye to dry before painting on the black part with food colour or drawing it with an edible ink pen. Optional: If you've piped the black dot on, immediately add a tiny white dot over that.
6. Pipe the hair. I gave one girl curly hair, and the other straight. The only problem with using a thinner consistency of icing is that you can't pipe the hair in one go; if you try to do this, the icing just melds into one blob. So pipe alternate strands, and once they've dried a bit, fill in the gaps.
7. Final details: you can either pipe or paint the eye-patch on. Use the thin paintbrush dipped in black food colour to do eyelashes (optional), and the smiley face on the hat. I used edible food pens in orange and gold for the other facial details: mouth, nose and freckles. Alternatively, use the thin paintbrush and paint these details on. The scarf is also optional: I piped it on with the pink icing and added the white dots immediately.

 Pirate Ship Photo Tutorial:

Pirate Ship Cookie Tutorial
1. Pipe the body of the ship and the lines for the masts. Leave to dry for half an hour.
2. Pipe alternate sections of the water. Leave to dry.
3. Fill in the remaining sections. You can see that you've got the effect of waves now. We wouldn't have that definition if it had been piped in one go.
4. Pipe the sails. Once the waves are dry, you could add a touch of white icing randomly to look like whitecaps. I used the paintbrush to drag it along the bottom of the ship to resemble spray.
5. Final details: Pipe the black flag; once it's dry you could paint on the X with a bit of silver dust mixed with a few drops of water. Mix gold dust and a few drops of water, and paint on the portholes and some random lines.

------------------------------

Pirate Girl and Ship Cookies

Comparing the cookies to the sketches, I think the ships turned out way better, especially after adding the details with gold. I'm going to need more practice to get the faces to turn out exactly as I picture them. But this project got me out of my decorating comfort zone, so it was a good learning experience. It was also great to take the simplest of cookie shapes and come up with a creative design. It takes patience, but it's really rewarding to make your vision materialise bit by bit. Please note that this tutorial is how I went about making these cookies and is just a guideline; if you've got a better way, go for it (and let me know too!)

Pirate Girl and Ship Cookies

Tuesday, February 04, 2014

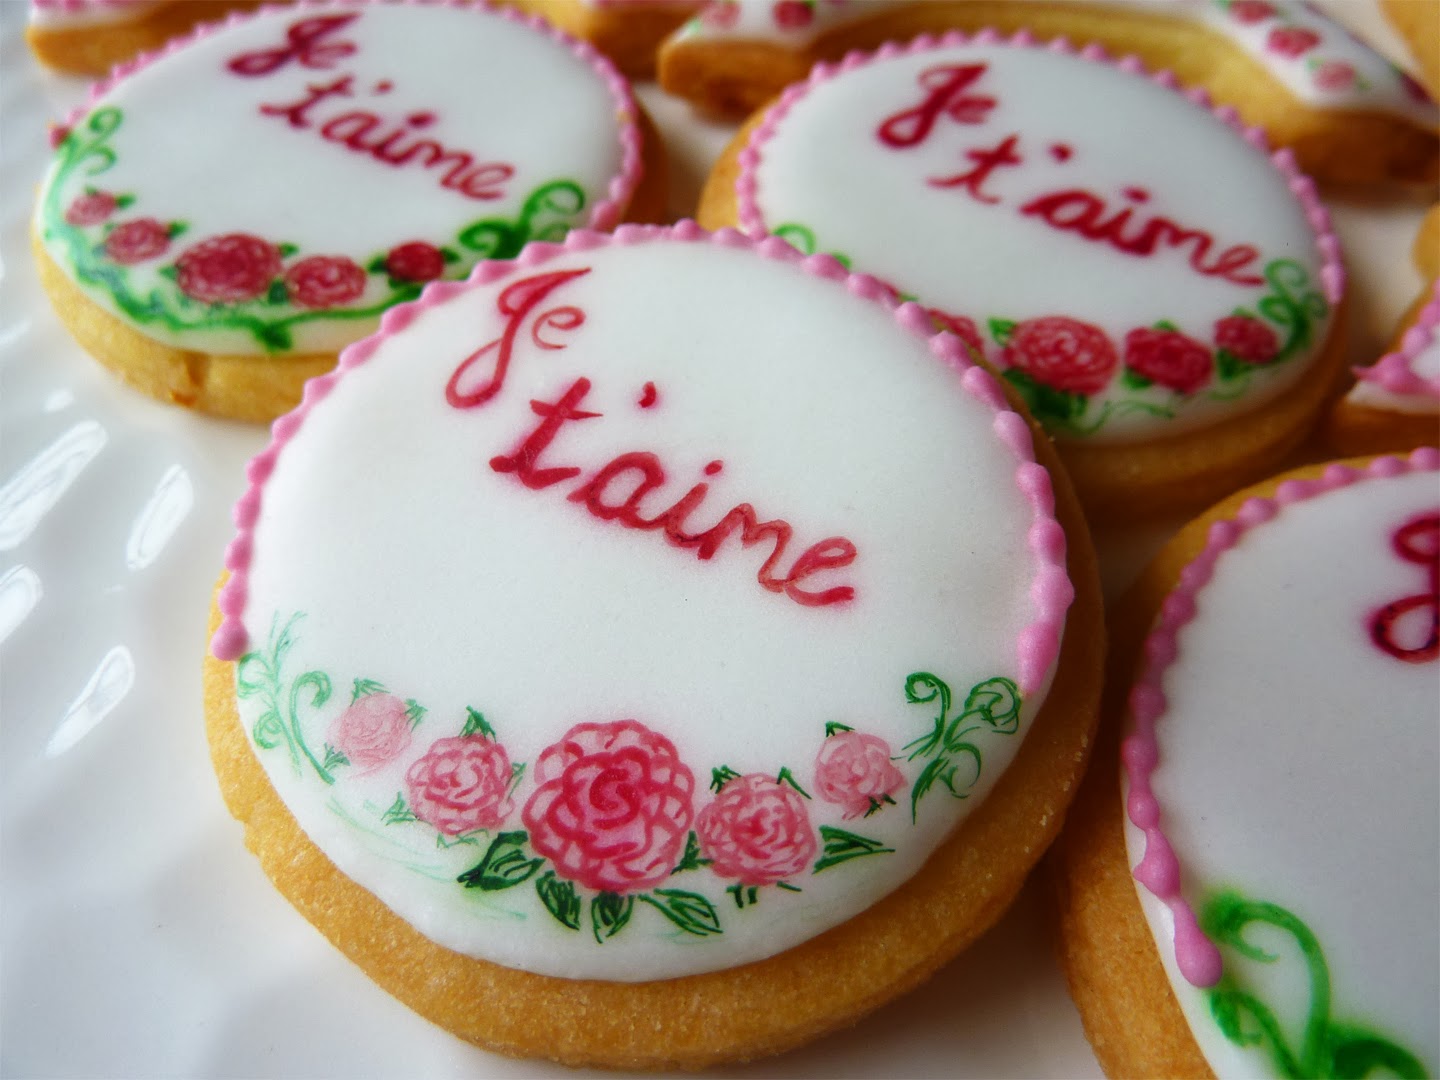
French-inspired Valentine's Day Eiffel Cookies

I've had France on my mind recently, for a couple of very good reasons. The first is a French film called The Intouchables. I had wanted to write a bit about this incredible movie in this post, but as I began, I felt that a movie as fine as this was, and that I enjoyed so very much, merited its own post. So I will come back to The Intouchables later, and move on to the second reason I've been thinking of France.

Ruby Red Shoes by Kate Knapp

My husband picked up this enchanting book for our daughter from the library. It was the illustrations that caught his eye and had him bringing it home. It is a very recent book by an Aussie author, and is about a young hare, Ruby Red Shoes, who lives with her grandma and is going on holiday to Paris with her.

I sat down to read it to my daughter Kris one bedtime. She was a bit skeptical as she is with any new book that she hasn't chosen herself. But on the first page itself was something that captured her attention immediately: the grandma hare's name - Babushka Galina Galushka! The moment I read that aloud, Kris went into a fit of giggles and couldn't wait to hear more.

To my pleasant surprise, what followed was a charming and humorous tale of young Ruby's escapades in Paris. You can feel the author's love for Paris in every page with her vivid descriptions of Parisian life and the gorgeous illustrations (she's also the illustrator). I thoroughly enjoyed it and so did Kris, but at four, she is too young to fully understand and appreciate the depth and charm of this lovely book. But at least we got to introduce her to a new country, a new city and bits of its fascinating culture.

The next morning, Kris was bubbling over about the book. Hubby decided he'd draw her a picture from the book. Both of them love to draw and that's one of their usual father-daughter activities - him teaching her how to draw different things. He started drawing the Eiffel Tower, and as he began, I remembered an old purchase, and immediately dashed off to the kitchen .... to return triumphantly with this: an Eiffel cookie cutter!

Eiffel cookie cutter

Kris was suitably impressed.
In awed tones, she asked: "Did you get it in Paris?"
My disillusioning response: "Ummm, actually I got it at Sydney Fish Market."

Crazy, but true! We had been to the main fish market a couple of years ago when my family was visiting. Among assorted varieties of seafood, you also have the odd stall selling knick-knacks at the fish market. So while the fish-lovers went nuts buying seafood, I went nuts buying cookie cutters! Anyway, the Eiffel cutter had been buried and forgotten in my cutter collection since then, but digging it out a few days ago triggered some ideas. I had been wanting to bake something 'love'ly with Valentine's Day around the corner, so I thought with all this talk of France and Paris in the house, why not do some French-inspired cookies?

Hand-painted French-inspired Valentine's Day Cookies

You can use any rolled cookie recipe for this. I used the basic sugar cookie from Glorious Treats. My Eiffel cutter being fairly small and slim, it doesn't leave a lot of cookie surface area to comfortably replicate the details of the real Tower. And in all honesty, even if I did have the room I probably wouldn't have gone with the actual lines, I just wanted to have fun! I thought of outlining the tower in roses. The hitch here was that piping roses that tiny would be next to impossible. So I thought, why not try painting? I remembered a post read long ago, again on Glorious Treats, that I felt would work perfectly here.

Hand-painted Eiffel cookie

It was great fun, hand-painting these cookies. I used regular supermarket liquid food colours for this project, and a paintbrush and palette that are expressly reserved for decorating purposes. I found painting a lot easier than piping, though you do need to be mindful of how much colour you get onto the brush; too much and you get blobs.

I also wanted to include some sentiment cookies, and I thought since they're French-inspired after all, I should convey those sentiments in French. Now this is one of those areas in decorating that gets me really nervous - text! I hate having to pipe out names and messages. But I have to say again, painting was a lot easier than piping.

Hand-painted French-inspired Valentine's Day cookies

This was the first time that I've tried painting on cookies. You do need a bit of patience to get it done, but I think it's well worth the effort. It took me about 15-20 minutes to complete each painted Eiffel cookie, and half that time per sentiment cookie. For the other Eiffel cookies, I just outlined them in bead piping and tried out this incredibly easy technique for tiny royal icing roses from Sweet Sugarbelle.

Valentine's Day Eiffel rose cookies

A couple of weeks ago while I was first considering ideas for Valentine's Day sweets, I was headed in a completely different direction. It was only reading that darling little book and the following events that sent me down this hand-painted path :) It's funny where you find your inspiration sometimes. Hopefully I've inspired at least one other person to try this out!

French-inspired Valentine's Day Eiffel cookies

Sunday, December 22, 2013

Cookie Tealight Stands


I made these saffron cookie tealight stands for Diwali earlier this year, and I'd promised a post on how to make them, so here goes.

The idea for these cookies comes from a book called Decorating Cookies by Joanna Farrow. You can use the rolled cookie recipe of your choice to make these stands. For this project, I've used a gingerbread cookie recipe as I'll be using these stands during Christmas.


One important point that I'll highlight in the beginning, and that isn't mentioned in the book, is to get simple glass tealight holders. You put the tealights in the glass holders and place the holders on the cookie base. This way, the cookie doesn't get direct heat from the tealight and stays fresh longer.

What you need:
Cookie dough (recipe of your choice, I'll link to some suggestions at the end)
Small glass tealight holders (check your dollar stores or Ikea)
Cutters - sharp knives / steel piping tips / straws
Template of your design (optional)
Decorations - cachous / dragees / sprinkles
Royal Icing - stiff consistency (piping consistency for decorating, optional)


You begin by rolling out your cookie dough and cutting out shapes for the front and the base of the stand. For the front, I've simply cut rectangle shapes, but you can use any shape you like. Just make sure it's big enough to cover the glass tealight holder. Cut circles, or squares for the base, and again, ensure it corresponds to the size of the front piece and is big enough for the tealight holder.

Note: If using fancy shapes for the front piece, you have to cut a straight line across the bottom of the cookie so that it'll rest evenly on the base. For the saffron cookies in the first picture, I used a round fluted cutter for the front cookie, and I had to trim the end off so that it would sit straight on the base.

Cut out your design on the front. I've just used a piping tip to cut circles out in the shape of a Christmas tree. A piece of drinking straw will also work well to cut out circles. If you have a more elaborate design, make a paper template. Place the template onto the cookie and cut out the design with a sharp knife.


If you want to use sprinkles, I feel it's easier to put them on before baking. I've used silver dragees / cachous here. Be gentle when you put these on; don't push them through the cookie.

Then bake the cookies as per recipe instructions. I bake mine a tad longer as I like my cookies crisper.


Once the cookies are cooled, you can decorate the front pieces with royal icing if you like, and let it dry for a few hours. I'm not sure how the warmth of the tealights would affect a cookie that's fully covered with royal icing, so both times I've made these tealight stands, I've kept the royal icing to a minimum and it's been perfectly fine.

Assembling the Tealight Stands:


1. Put the stiff consistency royal icing into a piping bag or ziploc bag with the end snipped off. Pipe a couple of thick lines onto the base cookie, about 1 cm away from the edge.

2. Place the front piece onto the thick icing, making sure it's standing straight, and then push down very gently.

Ensure that the front cookie isn't tilting forwards or backwards. If it starts to tilt, take it off and pipe more icing onto the base and place it again.

3. Once the front is securely standing on the base, fill in any gaps between the two cookies with more icing. You can see in the third picture how thin the icing looks on the left once the front cookie is placed on the base. So for more support, pipe one more line of icing on the back of the cookie. The book says you can prop up the front cookie with a small glass if need be. Let them dry for a few hours, and your edible tealight stands are ready to use!


You can store these cookies in a container deep enough to hold them, or if you don't have one, the book says you can leave them on a board or baking tray and wrap around loosely with cling film.

This is a fun project, and I hope you try it out and that it lights up your celebrations as well. Have a blessed Christmas and New Year!


Links to rolled cookie recipes:
Rolled Sugar Cookies - Glorious Treats
Chocolate Sugar Cookies - Glorious Treats
Eggless Saffron Cookies - Divine Taste
Gingerbread Cookies (recipe used for this project) - Craftsy

Saturday, November 23, 2013

Saffron Cookies with Rose Icing

Have you ever had one of those experiences where you encounter something so potent it immediately transports you elsewhere, makes you forget where you are? Before you get any ideas, I'm not referring to anything illegal :), but the exotically fragrant combination of saffron, cardamom and ghee, like in these cookies.


I first made a batch of these cookies a year ago. The sensory experience began as soon as I opened containers and the ingredients exuded their individual fragrances. But the magical moment was when those scents combined. Instantly, I was back in India, memories of countless mithai shops and festival celebrations swamping my mind. I actually stopped working and just stood there, eyes closed, till that wave of nostalgia receded.

Since then, I've made these cookies quite a few times. I was initially drawn to try this recipe as it is eggless, and I thought it'd be handy to have a good eggless rolled cookie recipe. But I go back to it every now and then because it is such a powerful, not to mention delicious, reminder of some of the best things of home.


The original recipe comes from Divine Taste, a beautiful blog run by the sister of a dear friend, and can be found here. I've stayed true to it, except for the pistachios. Though I like munching on pistachios by themselves, I've never cared for them strewn across any sweet. The cookies still taste gorgeous plain, but my decorating instinct insisted on some adornment, so the next time, I drizzled a simple icing sugar glaze over them.

Even then I wasn't fully satisfied. Something kept nagging me and I knew there was potential to enhance this cookie still further. I started thinking of flavours that would complement the saffron, and the answer struck almost instantly - rose water.


Rose Icing
1 cup sifted icing sugar
2-3 tbsp rose water

Add the rose water gradually to the icing sugar, just till you get the consistency of honey. Put the icing in a piping bag or a ziploc bag with one corner snipped off a bit. Alternatively, you can just drizzle the icing from a spoon, only the drizzles wouldn't be as uniform.

The only downside of this icing is that it doesn't dry hard; so you can either ice the cookies right before serving, or then store them in a way that the icing doesn't touch anything else. If you would like to package these cookies as gifts, I'd recommend using royal icing as it sets hard. Rose water blends beautifully with royal icing, and when you use this icing you have the added advantage of being able to pipe on any design you fancy. So you can add rose water gradually to the royal icing till you get drizzling consistency, or just add a few drops till you get piping consistency.

------------------------

The last time I made these cookies was this Diwali. Since it was the festival of lights, I used these cookies to try out an idea I'd come across recently - cookie tealight holders!


I decorated these with some gold cachous and rose royal icing. I'm pleased to say my edible tealight stands lasted brilliantly through all the nights of Diwali. I'd really wanted to get into a how-to over here, but then felt this post would seem unending. So I promise I'll be back with a post on making these tealight stands.

In the meanwhile, please try out the cookie recipe. Whether you choose to leave them plain, garnish with pistachios or decorate with rosy icing, I can guarantee you a truly memorable, definitively desi cookie!