

I began planning the cake a few months ago. I knew I would do a character-themed cake and that it'd be two-tiered. But my early ideas veered towards the Teletubbies, who were the child's obsession at the time. Fortunately fate intervened: we'd borrowed a Pooh DVD from the library, and she absolutely fell in love with all the characters! Me too, for that matter. I have to say, of all the current popular cartoons, Pooh and his pals are my favourites. The clincher was when we checked out a party supplies store and found this Pooh candle; the only Pooh candle in the store, and it was with the number three. Perfect!

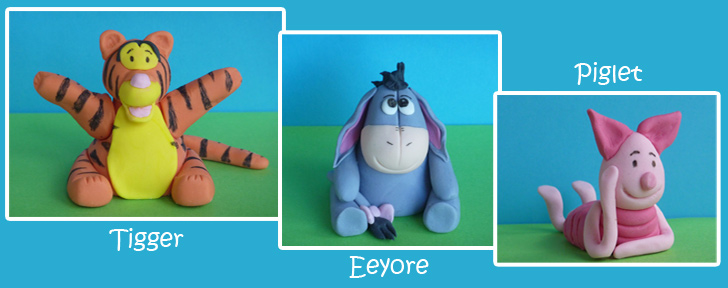
I had only briefly dabbled in fondant figures, prior to this. I had a rough idea of how to proceed, but wanted more guidance. So I went to Youtube looking for answers. I made Tigger more or less as per this, using the materials I had on hand. Watching this video helped me learn how to analyse a picture and break it down into smaller parts that I could create and combine into the final product. It took me a few tries to get Tigger reasonably ok, and then I decided to try the other two figures without watching any tutorials.

Of the lot, I feel proudest of Eeyore. I think he turned out the best. If you'd like to try your hand at fondant figures, there are plenty of good tutorials on Youtube for all sorts of objects / characters. Most figures will take at least a couple of days to dry out, so you should make them well in advance. I did these almost a month ahead, and left them on a plate dusted with icing sugar (so that they wouldn't stick to the plate), for 4-5 days before placing them in a box loosely covered with plastic wrap (fondant should never be refrigerated or frozen).
The flowers are absolutely straightforward: thinly roll out fondant on a surface dusted with icing sugar and cut out with cutters of your choice. This is a really fun process; I had a good friend help me out with them and she enjoyed herself thoroughly. You can either make centers with tiny fondant balls or just pipe them on with the icing of your choice. To secure them to the cake, I used water for some and royal icing for the others, and the moral of the story is use royal icing everytime. It's like cement in cake construction.
The cake itself is adapted from Rachel Allen's recipe for Marble Cake, except that I skipped the marbling part :) I love this recipe, especially for stacked cakes, as the cake is not too moist, neither dry, making it firm enough to withstand the weight of the fondant covering and decorations. The other advantage of this recipe is that it keeps fairly well at room temperature for nearly 10 days, perfect when you need to get decorating a few days in advance. (This cake was made during winter; in a hot and humid climate, it might not keep as long). I baked the cakes 4 days before the big day.

We'd invited a few friends to celebrate with us at a nearby park. It was the first time I had to transport a cake, and I'm relieved to say that minus a few flowers falling off (the ones stuck with water), the cake made it intact. I'd carried the fondant figures separately, and placed them on just before we cut the cake. One of our guests is a photographer and I owe him for these on-location shots :)

wow Shalom..what awesome cakes!
ReplyDelete@ Renu - thank you so much!
ReplyDeletePerfection!
ReplyDeleteAnd belated happy birthday to the birthday girl :-)
Gorgeous....absolutely stunning...gosh it must have taken u ages to do the whole cake;-o.
ReplyDeleteI've been meaning to make a princess cake for sometime now but chicken out everytime;-P
The confidence & satisfaction u got out of making this one....I can only imagine, kudos:-)).
@ A - Thank you so much!!!
ReplyDelete@ Reflections - Thank you! Yup, cake decorating (or any sweet decorating) is very rewarding for me. It did take me a while, probably would've gone a lot faster if I knew completely what I was doing :P
Goshhhhhhh! Kudos Maam! splendid!
ReplyDeleteI bow to ur patience! I had read about ur love for baking, but with this u have taken it to a whole new level!
And lucky Kristyn, she must be one happy girl!
Wish her a very happy birthday (though belated) May she have the most joyous and blessed life!
@ Amrita - thank you so much for the comments & the wishes :D
ReplyDelete