Showing posts with label Cakes. Show all posts

Sunday, April 27, 2014

An Easter Education

"Is Easter the Easter bunny's birthday?" went the innocent question from my daughter Kris last year. Even as I laughed and pulled her in for a cuddle, I began wondering how I would tackle this. I grew up in a country where Easter was not a national celebration; it was significant only to the Christian community and we all knew that the central figure in the Easter story is Jesus (the bunny was way low-profile back then). Kris is growing up in an environment where all the major Christian festivals may be national holidays, but where Jesus is far removed from the mainstream celebrations and associated imagery. Santa becomes the star at Christmas, and Easter is the bunny's time in the limelight.

So it's quite understandable that Kris thought Easter revolved around the bunny. Of course I wanted to set her straight, but how do you explain death and resurrection to a three-year old and not leave her scared, or scarred? At the time, I simply told her that Easter was about Jesus, who was 'taken away' by the 'bad people', but that He managed to come back and save everybody, and that is why we celebrate Easter.

Placing marzipan crosses on the Hot Cross Bun Cookies
Kris putting the marzipan crosses on Hot Cross Bun Cookies

Don't get me wrong, I'm not against Santa or the bunny. I think they add a fun element to these celebrations and I happily share Kris's excitement in the Easter egg hunts and hat parades. We enjoy making Easter bonnets and bunny masks and as you can see here, we've been busy baking to share treats with our friends. But at the same time, I feel it's essential to remember what's really at the heart of this celebration, and more importantly, to take the time to help my child understand that too.

Easter sugar cookies and gift basket
Easter sugar cookies. Left: bunny-scape. Top right: Easter egg cookies. Bottom right: Easter gift basket.

Kris is now a year older, and wiser (sort of :D). Because of tv and her peers, she now has words like 'dead' and 'kill' in her vocabulary, which gave me room to be more specific about the Easter story this year. We've been going through her kiddy Bibles, reading the stories from them, and this has led to some memorable conversations. I will always cherish the priceless expressions that race across her face as she tries to absorb it all.

Our talks have also had another unexpected effect: in teaching Kris, I am learning afresh too. In searching for words to explain our faith in its simplest terms, I found myself reconnecting with it more profoundly than I ever have before. And it feels like I'm discovering the beauty of it all over again, which when you think about it, is exactly what this period should achieve.

Easter Sunday then dawned and we had a quiet morning at home. I was feeling rested and renewed. We video-chatted with my family and when my mother asked Kris why we were celebrating, she said it was because Jesus died and came back to save us.  I lit up with her answer .... and then deflated a moment later when she said, "but the bunny is the bigger part about Easter." {sigh}.

It's going to take quite a few Easters before she really gets it. I know it's a slow and lifelong process. Her questions haven't abated in the week since, and I'm encouraged that she wants to keep reading from her Bible, instead of me making her do it. Of all the things we do together, I especially treasure the time we've spent discussing Jesus over the past few weeks. I only hope I'm able to sustain her interest, and help her budding faith flourish. 
 
Piped royal icing filigree cross cake topper
An incredibly fragile royal icing filigree cross atop a simple vanilla cake with cream cheese frosting & toasted almonds.

Monday, March 10, 2014

Milestones and a Macaron-Covered Cake

I think '30' started getting hyped up a few years ago. Or is it that I only started paying attention to the hype the closer I got to 30? Anyway, the closer I got, the more I started thinking about it and I guess I was mostly neutral; I never flipped out, but neither did I go, yaaay I'm going to be 30. Till some tragedies occurred close to home and shocked me into thinking straight: every day you're here, is a day to be glad for.

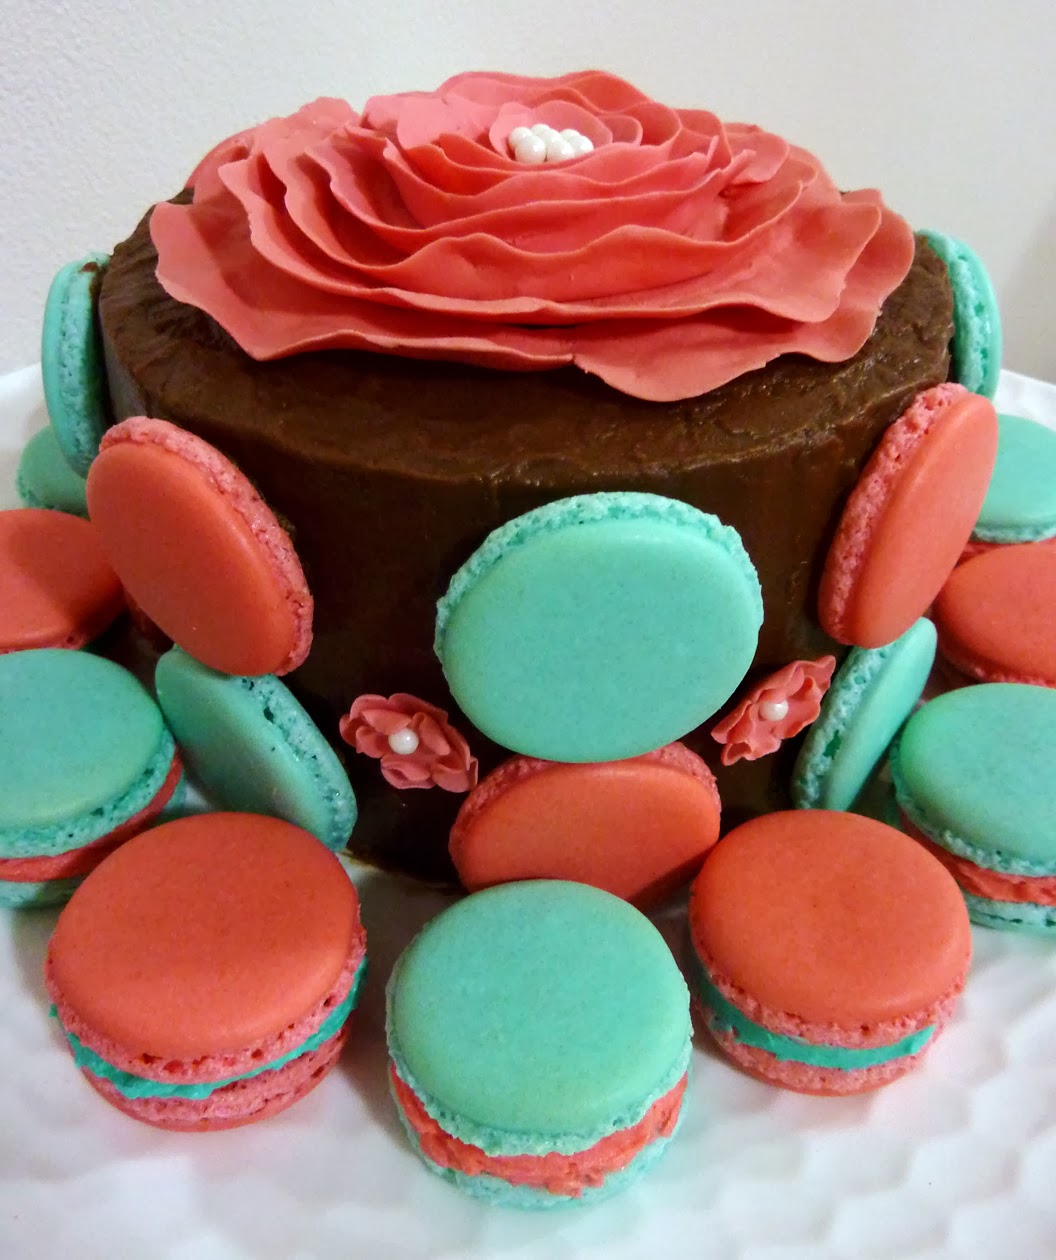
Chocolate cake with peppermint buttercream filling, fudge frosting and macaron shells

So I thought turning 30 deserved a special effort, when usually I just buy a couple of slices from my favourite bakery. And I hoped that if it turned out alright, I might be able to share recipes and ideas here. The cake itself came out great, though my macarons, while tasty enough, have a long way to go before they're technically proper.

The cake is the same Devil's Food Cake I made for my daughter's birthday last year, and the recipe is at the end of this post. This time, I used a third of the measurements to make three 6" layers each, that were sandwiched with buttercream (recipe over here). I used half this buttercream recipe and flavoured it with peppermint extract instead of vanilla. I divided the buttercream into two batches, dyed to match the two macaron colours. The frosting is a dark chocolate fudge, that I tried for the first time, and came out superbly. I had wanted to put a big flower on top, but honestly was a bit intimidated by them, till I found this easy technique.

I wanted to use macarons somehow, as they are my daughter's favourite dessert at the moment. However, they are notoriously tricky to get just right, and even on my fourth attempt I am far from getting the perfect texture. Should you want to give them a shot, here's a good video to get you started. I placed some unfilled macaron shells on the cake, and later kept some filled macarons around it. For the filling, I used the same peppermint buttercream as in the cake.

Chocolate cake with peppermint buttercream filling, fudge frosting and peppermint macarons

Now on a personal note, I had wondered if I should share some .... thoughts, on turning 30, but then I er, thought about it, and didn't feel like I had many :), except that sense of inexpressible gratitude. Even after reading this touching post by my friend Neelu, I didn't feel like I had much to say, as I thought she said it all, and said it brilliantly.

But then my birthday arrived. Start to finish it was beautiful, by God's grace. I received some wonderful, unexpected surprises. Wishes flowed in from friends and most of my family .... except for one person. My daughter :). She refused to wish me all day, right up to when we were about to cut the cake later that night, at which point her dad said enough was enough: wish mum now! She did, with a sheepish grin, and sang happy birthday as well.

The reason for all the drama? She's anti-birthdays at the moment. All you folks out there freaking about turning 30, 40, whatever, my little girl's got you beat. She's worried about turning five! Why? Because she doesn't want to leave preschool and the teachers she loves, doesn't want to go to 'big school' and doesn't want to grow up :) So for her right now, birthdays (mum's and her own included) are silly.

Then, the next day I received this incredible gift from my family. All my dad had told me before, was to expect a couple of DVDs in the mail. I sat to watch the first without a clue as to the contents. Words can't express the sheer joy I felt when I saw what it was: the recordings of mine and my sister's first birthdays!

Video recording had just taken off in India when I was a baby, and my first birthday was the first recorded event in my family. We had these on the old VHS tapes (remember those?), and over time they started gathering mildew and couldn't be viewed properly. So with a great deal of sadness, we all wrote them off as lost causes. I don't think any of us watched them in at least a decade. But on a recent trip back to our house in India, my dad found the tapes and got the salvageable portions converted to DVD format.

It's a priceless gift for all of us, something we thought we'd never see again, carefully restored. Even more priceless, because they include people we loved, like my grandfathers, who are not with us anymore. Precious memories in a tangible form that I can now share with my child, and show her at least some part of her history, and where she comes from. And yes, also help her to understand that she is not the only one who's had to deal with growing up; I too was a child like she is now, and I too had to grow up and go to big school and so on :)

All of these things made me realise that I actually do have a few thoughts that I'd like to share, so here goes:

  • Embrace your age wholeheartedly, and be thankful for it. If you ever start feeling otherwise, spare a thought for all those who weren't lucky to make it to whatever age you are now.
  • No matter where you reach, never forget where you've come from and the people who've been a part of your journey; more importantly, those that have helped you on that journey.
  • Change is inevitable, and seldom easy. But you do your best to deal and go on trusting He knows your way forward.
  • This is an echo of what Neelu said in her post, that I feel more strongly about now, having seen those DVDs again: document your life story! I am so grateful to my parents for choosing to record our birthdays; and so grateful to God for every moment from those first milestones to this one.
Chocolate cake and a glass of red!

Sunday, October 27, 2013

Pink-guins and a Beautiful Chocolate Cake!

My daughter turned four recently. Her birthday is the single point in the year when I don my party planner's hat. To decide on a theme I started thinking of all the things she liked at the time. Thanks to Happy Feet and Madagascar, she liked penguins then, so I thought it'd be cute to make some sweet lil penguins - in the form of cake toppers, cake pops and cookies.

Straightaway, I knew I wasn't going to stay true to nature and make my penguins black. Though it's one of my favourite colours, I wanted a more childlike, cutesy colour scheme. Pink and purple popped into mind instantly. I know it's a cliched combination, but the more I considered it, the more I liked the idea of making pink-guins!


I'd planned to do a plain white cake with pink-guins, and pink and purple polka dots, but when I visualised it, I felt that it might need a third colour to liven it up. I was leaning toward silver, but I wasn't fully convinced it was a good choice. For inspiration, I visited one of my favourite craft stores hoping to pick up some ribbon for the goodie bags.

What I found was this:


It's a roll of masking tape, or washi tape, that is mostly used in paper crafts. Pink and purple dots, along with brown and that beautiful, vibrant, perfect golden yellow. Jackpot!

I used the tape for two things. Firstly for the goodie bags.


And then on the packaging for the cookies that went into the goodie bags.


Now about the cake itself. I gave the choice of flavour to the birthday girl, and the reply was immediate: chocolate! How much I loved her in that moment! Then it changed to chocolate and strawberry, then one layer of chocolate and one of strawberry, strawberry layer on top, chocolate down and ..... I didn't like which direction this was headed in, so I said two layers of chocolate with strawberry buttercream in the middle, which met with reluctant approval. Here's how it ended up looking.


The igloo was a simple vanilla cake baked in this bowl-shaped cake pan I bought because it was ridiculously cute. But the credit for the igloo concept goes to my sister. The idea struck her the moment she saw the the pan. And the credit for the flowers goes to my daughter. I'd wanted to do polka dots, but a birthday cake without flowers is taboo apparently. But kudos to her because I think the flowers worked out beautifully, better than the dots would've.

The only part of this whole penguin parade that didn't turn out as I'd hoped were the cake pops. 


They look ok enough, but problems with getting the texture of the chocolate coating right combined with a lack of time and energy had me go through the dipping stage hastily, without much finesse. Anyway, despite their less-than-perfect appearance, they were delicious and the kids loved them, which is what matters in the end.

And now finally, as mentioned in the title of this post - the beautiful chocolate cake! I'd been trying out various chocolate cake recipes off the Internet lately but not really liking any. Then I found this gem in a book I borrowed from the library. Let me tell you why I love this cake: it's quick to put together, it's moist and delicious without being overly rich, it keeps wonderfully. Best of all, even after being stashed in the freezer for a month, once it was thawed, it tasted as beautiful as on the day it was baked.

The birthday cake above is two of these cakes sandwiched with strawberry buttercream. Apologies for not having any pics of the inside of the cake.

Devil's Food Cake (from Good Housekeeping Great Cakes)

100g (3 1/2 oz) unsalted butter, softened
225 ml (8 fl oz) milk
1tbsp lemon juice
225g (8 oz) plain flour
1 tsp bicarb of soda
50g (2oz) cocoa powder
250g (9oz) golden caster sugar
3 medium eggs, beaten

1. Preheat the oven to 180 degrees (160 fan oven), gas mark 4. Grease two 20.5 cm (8 inch) sandwich tins and baseline with greaseproof paper. Alternatively use one 9x13 inch pan for one rectangle layer.
2. Pour the milk into a jug, then add lemon juice or vinegar and leave for 5 min. Sift the flour, bicarb of soda and cocoa powder together.
3. In a large bowl, cream the butter with half the sugar until light. Gradually beat in the eggs, then mix in the rest of the sugar. Add the reserved soured milk alternately with the flour mixture - around a couple of tbsps at a time.
4. Divide the mixture between the prepared tins and level the tops. Bake for 30 min. Leave in the tins for 10 min, then turn out onto wire rack to cool. 

Thursday, January 31, 2013

Basket of Roses: Mini-Sponge Cake with Buttercream

Do you know how sometimes things you've seen as a child can leave a lasting impression on your mind? For me, some of those things are the pictures from my mother's cake decorating books. My mother is an avid baker. She baked and decorated most of the birthday and special occasion cakes in our house. She didn't have the benefit of classes; what she did have were these gorgeous books my father would get, and she learned from those.

As a child, I would pore over those books, the pictures of one stunning cake after another holding me in thrall. One of the images that has gripped my imagination all through the years is that of a basket cake with chocolates on top. Attempting something similar was on my to-do list for a long time. And I finally got the opportunity for our anniversary a few days ago.


The cake itself is a simple sponge cake. I prefer using this type of light, fat-free cake, especially when it's going to be smothered in luscious buttercream, so that it's not too rich overall. I cut out two rectangles from a regular 9" cake for my 'mini-cake'. (If you're a smart one like my sister, you might wonder why I didn't just bake a rectangular cake; answer: I don't own a rectangle pan!) And why a 'mini' cake? Simply because this was the first time I was trying basketweave piping; I've learned the hard way, to start small when you try something new.

Sponge Cake (adapted from Taste.Com)

25g cornflour
25g plain flour
25g self-raising flour
2 large eggs, at room temperature
75g caster sugar
1 tsp vanilla essence

1. Preheat oven to 180C. Grease and line a 9" round cake tin with parchment paper. Sift the flours together three times (the original recipe includes a pinch of salt, which I omitted; add if you prefer).
2. Using electric beaters, beat eggs and sugar on medium-high for 6 minutes, or till pale and tripled in volume.
3. Sift flour mixture over egg mixture in small batches, and carefully fold with a metal spoon. Be gentle with the sifting and folding, so that the air that has been incorporated in step 2 is not knocked out. Fold in till the flour is just combined.
4. Pour the batter carefully into the tin. A great tip from Taste.com was to spin the tin gently to level the batter. Bake for 20 minutes, or till the cake is beginning to pull away from the sides and springs back when gently touched. It's really important with sponges to know your oven, as over-baking can result in a dry cake, instead of a light, fluffy one. My oven is hotter, so I took the cake out at about 18 minutes.
5. Turn the cake onto a wire rack, and peel away the parchment paper. Leave to cool.

Buttercream Frosting / Filling (adapted from Wilton)

1 cup unsalted butter, softened
4 cups icing sugar, approx
1 tsp vanilla extract (or flavouring of choice)
2-3 tbsp milk or heavy cream

1. With electric beaters (or in a stand mixer), cream butter to get it smooth. Add icing sugar a cup at a time, and work in gently before turning beaters on so that you don't get a snowstorm of sugar in your face.

2. Add milk and extract and beat to combine. The amount of milk you add depends on what the buttercream is for. If it is to cover a cake, you might need more than 3 tbsp to get a spreading consistency. If it is for piping, different types of consistencies are needed for different patterns. I make a sort of master batch of stiff buttercream (like you need to pipe roses), and then take out smaller amounts and add enough milk to get thinner consistencies. I find it easier to add milk to thin down buttercream, than to add sugar to thicken it, but that's me. Store the buttercream in an airtight container in the fridge.

----------------------


I actually made the cake a few days before I needed it, cut out my rectangles and wrapped each first in parchment paper and then in cling film, and stuck them in the freezer. I haven't worked with thawed cakes, and wanted to see how they turned out. Pretty well, in fact. I just took them out of the freezer, unwrapped and left them to reach room temperature before decorating.

Once at room temperature, sandwich the two layers with buttercream. Then apply a crumb coat - which is simply a thin layer of buttercream all over the cake to seal in the crumbs, so that they don't get into your final icing. Refrigerate the cake till the buttercream has set. Then transfer to your serving platter before beginning the basketweave.

For the basketweave effect, Wilton's instructions are pretty straightforward; I followed it exactly. And once I got into the rhythm of it, it turned out to be quite easy. The only hitch in the process is that as you pipe, the warmth of your hands warms up the buttercream, making it droop instead of holding its shape; so you'll need to periodically chill the piping bag. Ideally, two bags would be best, so that you can work with the other while the first is cooling down and so on.

For the top, I just dolloped some green buttercream and spread it over. I had wanted to pipe leaves as well, but a bad back got in the way.

For the roses, while I did use the Wilton method, the written instructions left me hesitant. Youtube was more helpful. Of all the rose-making videos I watched, I found this one to be the most complete.  You can make buttercream roses and place them on the cake immediately. I made mine out of royal icing; once they've air-dried for a couple of days, store them in an airtight container and they last almost indefinitely. I prefer doing this as you can have the flowers ready weeks in advance.

I loved this because most of the elements - the flowers, the cake and the frosting - can be made well ahead of time. Even the crumb-coated cake will sit well in the fridge for a day. That leaves you with only the piping work for the day before you need the cake. This would be a lovely cake to gift someone special .... just imagine, a basket of roses that's entirely edible!

Saturday, January 05, 2013

Christmas 2012 Cupcakes and Cake

Wrapping up 2012 with the cakes I baked.
Red velvet mini-cupcakes with cream cheese frosting and handmade fondant Santas, that hubby took to work.


Orange mini-cupcakes with cream cheese frosting and chocolate button reindeer.

And last but not the least, 2012 Christmas fruit cake. 

And now, looking forward to another year of baking & decorating!

Friday, October 05, 2012

Birthday Baking Part 1: Winnie The Pooh Cake

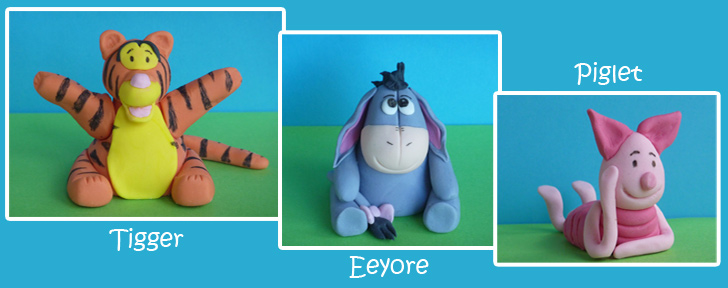
A tiger. A donkey. A pig. And a whole lot of flowers. The best part? They're all made in sweet, sweet fondant! And they all featured on my darling girl's birthday cake this year.


I began planning the cake a few months ago. I knew I would do a character-themed cake and that it'd be two-tiered. But my early ideas veered towards the Teletubbies, who were the child's obsession at the time. Fortunately fate intervened: we'd borrowed a Pooh DVD from the library, and she absolutely fell in love with all the characters! Me too, for that matter. I have to say, of all the current popular cartoons, Pooh and his pals are my favourites. The clincher was when we checked out a party supplies store and found this Pooh candle; the only Pooh candle in the store, and it was with the number three. Perfect!


 I had only briefly dabbled in fondant figures, prior to this. I had a rough idea of how to proceed, but wanted more guidance. So I went to Youtube looking for answers. I made Tigger more or less as per this, using the materials I had on hand. Watching this video helped me learn how to analyse a picture and break it down into smaller parts that I could create and combine into the final product. It took me a few tries to get Tigger reasonably ok, and then I decided to try the other two figures without watching any tutorials.


Of the lot, I feel proudest of Eeyore. I think he turned out the best. If you'd like to try your hand at fondant figures, there are plenty of good tutorials on Youtube for all sorts of objects / characters. Most figures will take at least a couple of days to dry out, so you should make them well in advance. I did these almost a month ahead, and left them on a plate dusted with icing sugar (so that they wouldn't stick to the plate), for 4-5 days before placing them in a box loosely covered with plastic wrap (fondant should never be refrigerated or frozen).

The flowers are absolutely straightforward: thinly roll out fondant on a surface dusted with icing sugar and cut out with cutters of your choice. This is a really fun process; I had a good friend help me out with them and she enjoyed herself thoroughly. You can either make centers with tiny fondant balls or just pipe them on with the icing of your choice. To secure them to the cake, I used water for some and royal icing for the others, and the moral of the story is use royal icing everytime. It's like cement in cake construction.

The cake itself is adapted from Rachel Allen's recipe for Marble Cake, except that I skipped the marbling part :) I love this recipe, especially for stacked cakes, as the cake is not too moist, neither dry, making it firm enough to withstand the weight of the fondant covering and decorations. The other advantage of this recipe is that it keeps fairly well at room temperature for nearly 10 days, perfect when you need to get decorating a few days in advance. (This cake was made during winter; in a hot and humid climate, it might not keep as long). I baked the cakes 4 days before the big day.


We'd invited a few friends to celebrate with us at a nearby park. It was the first time I had to transport a cake, and I'm relieved to say that minus a few flowers falling off (the ones stuck with water), the cake made it intact. I'd carried the fondant figures separately, and placed them on just before we cut the cake. One of our guests is a photographer and I owe him for these on-location shots :)


Wednesday, August 15, 2012

My Take on ABC Cake!

I am a passionate baker, always on the lookout for the slightest excuse to get baking. However, I'm also particular that my family eat healthy (for the most part ;D). So my usual everyday baking is not what I would call indulgent, with the heapings of butter and sugar that most baked goodies require.

I'm always browsing for healthier alternatives, but more often than not, the results are just so-so. They're not bad per se, but nothing worth mentioning, certainly nothing worth blogging about. So you can imagine my delight when one of my healthy baking attempts produced this gorgeously moist cake!

I came across this recipe for Low Fat Banana Cake, which was easy enough. One hitch: it called for three bananas, and I only had two at the time. So what to replace the missing banana with? The answer was right there in my fruit basket, next to the bananas: apples! Or more precisely, applesauce.

That issue settled, a vague memory surfaced: I'd read somewhere about an ABC cake, which had apples, bananas and carrots. I thought, there are two fruits in this already, do I really want to add carrots to this? No! There's only so much healthy eating you can do. Then it struck me, I could still do an ABC cake; only chuck the carrots, and bring on the choco-chips! And by using dark chocolate chips, I satisfied the health criteria too :D


Here are the stars of the ABC cake. I deliberately left one banana with the peel on. I know it looks unap'peel'ing (sorry, couldn't resist :D), but when you bake with bananas, the riper they are, the better. They mash up well, and the end product goes deliciously gooey.

Low Fat ABC Cake

2 cups all-purpose flour
1 tsp baking powder
3/4 tsp baking soda
3/4 cup brown sugar
1 egg, lightly beaten
1/2 cup low fat milk
1/4 cup canola oil
1/2 cup applesauce*
2 medium-sized ripe bananas, mashed
1 tsp vanilla extract
1/2 cup choc chips

Method:

1. Pre-heat oven to 180 C / 350 F. Grease and lightly flour a 9-inch round or 8-inch square cake pan (I used the square one), or coat with nonstick spray.

2. Whisk flour, baking powder and baking soda in a small bowl.

3. Place brown sugar, egg in a large bowl; beat with a mixer at medium speed until fluffy. Add oil, milk, applesauce, mashed banana and vanilla extract and mix until well blended.

4. Gradually mix in flour mixture until just moist. Fold in chocolate chips gently, taking care not to overmix.

5. Pour batter into cake pan and bake for 45 minutes. Cool on a wire rack.

* For the Applesauce

You can use store-bought sauce if you can get it, but it's easy enough to prepare yourself. I peeled, cored and diced two medium apples, placed them in a saucepan and covered with water. Bring it to a boil over medium heat and then simmer 15-20 minutes or till it's easily mashable with a fork. You might need to replenish the water in between, but add a little. You should end up with a thick, smooth sauce, not something too runny. With two apples, I got 1 cup of sauce. This cake recipe requires only 1/2 a cup, so once it's cool, you can refrigerate the remaining half in an airtight container. It should keep upto a week. I used my leftover sauce in pancake batter the next morning :)


Quite a homely looking cake, but don't judge it by its appearance. I had just managed to get one quick shot of it, before a couple of unexpected guests dropped in. As they themselves noted, their timing was perfect ..... there is nothing quite like walking into a home filled with the scents of baking. A third of the cake disappeared in the next few minutes :)